Virtual Ports Tab

Contents
This section is only for those using the virtual serial ports (VSP) instead of the default REST API. If you use REST API you can skip this section. Also note Virtual Ports tab is hidden when using REST API.
An unfortunate aspect of serial ports is that they create unique point to point connections which exclude more than one application at a time from connecting to the mount. This limitation is more than outweighed by the robustness and dependability of serial connections, and these qualities are why serial connections are still the preferred method of control in industrial applications.
The Astro-Physics V2 ASCOM driver allows multiple ASCOM applications to connect but it does not allow multiple non-ASCOM applications to communicate to the mount using the mount's native protocol. To allow APCC to talk to multiple applications, APCC provides 4 virtual COM ports that allow (up to 4) applications to use the mount's native command protocol simultaneously. Such applications may include the AP V2 ASCOM Driver, PulseGuide, and Software Bisque's TheSky6/X or other non-ASCOM programs.
Note: Be sure that you are running all of your applications (MaximDL, etc) at a regular level and not "as administrator." If you run a mixture, you will get two ASCOM driver instances (one for regular users and one for administrator) and that will cause problems. This is not caused by an issue with the driver or APCC, but the way Windows COM interop functions. |
The normal configuration is to devote the first Virtual Port to the AP V2 ASCOM Driver. This was explained in the Getting Started Section. We highly recommend that you follow this practice. As mentioned in the Getting Started Section, selection of COM numbers for your virtual ports should not be done without some thought and planning. We have found that it is a good idea to reserve the lower port numbers for "real" serial ports. These include actual serial ports in the computer as well as all of your USB to serial adapter ports. As a suggestion, start your virtual port numbering with COM11, or even COM21 if you have many serial devices. This prevents conflicts if you need to change a USB to serial adapter and don't want to fight with the Windows port assignments.
•It is fine to define all of your ports ahead of time, but only create the ports that you will actually be using during a session.
•If you plan to use PulseGuide through a virtual port, note that it only allows COM numbers up to COM 10
APCC's virtual ports communicate with the mount in an intelligent way, routing commands from each virtual COM port to the mount and back out to the originating virtual port. This prevents the commands from different virtual ports from getting mixed up.
The status of the COM port and the virtual ports is displayed near the bottom left of the main window. You can select a virtual port to be potentially created from the drop-down list next to each Create button. Once you define a virtual port, you will see the port name appear in gray letters on a black background. If no virtual port is defined, the Create button will be disabled and the label will say None in the virtual port status labels. Here is a table showing the different color states:
No virtual port is defined. |
|
Virtual port defined but not created. |
|
Virtual port defined and created but not opened by any application. |
|
Virtual port defined, created, and an application is connected to it. |
|
Communication error |
Blinking |
NOTE: The Connection Box shown on this screen shot is out of date, however the changes are not important to this discussion. They will not be updated at this time due to the complex labeling.
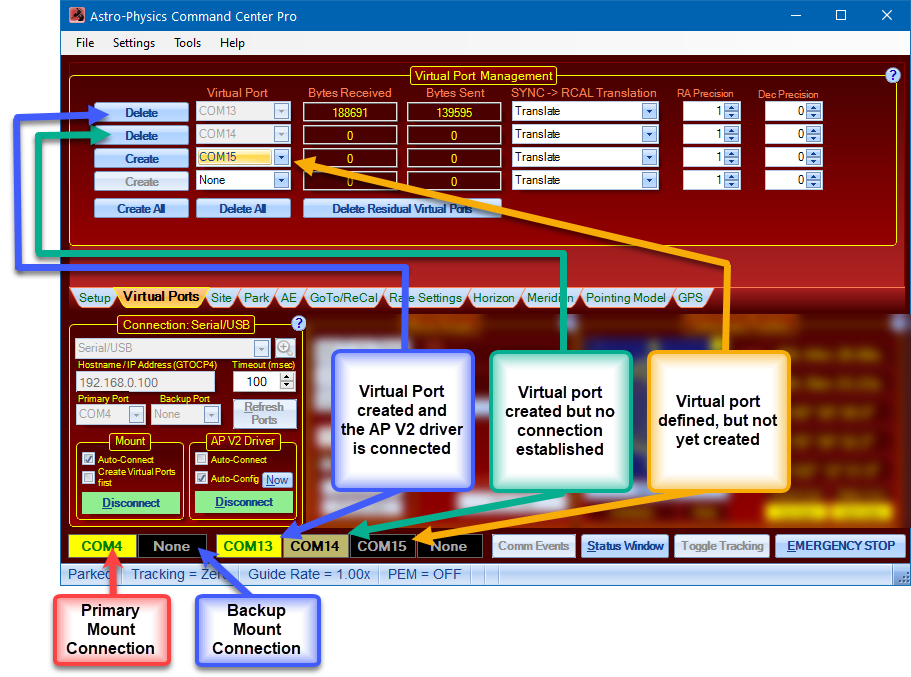
Create: Creates a virtual port when clicked. You must have an available port selected from the corresponding Virtual Port dropdown list. Once a virtual port is created, it's color changes to a dim yellow with black letters and this button changes to Delete. YOU MUST click the "Create" button to create the port in your system! This isn't simply an APCC option, but goes to the heart of the PC's operating system.
Delete: Click button to delete the virtual port.
Virtual Port: The drop down list from which to select a virtual port. Don't choose a port the same as another port or that already exists on your computer.
Create All: Click button to create all defined virtual ports.
Delete All: Click button to delete all created virtual ports.
Delete Residual Virtual Ports: You can try this option if virtual ports remain even after an attempt to delete them fails. If this does not work rebooting should remove the virtual ports.
Auto-connect Driver when APCC connects: Check this option if you plan to start APCC first before using any ASCOM client applications. This will allow ASCOM clients to connect more quickly the first time they try to access the ASCOM driver. Uncheck this option if you want to have the driver start APCC when the first ASCOM client tries connecting to the mount. Most people with permanent or remote setups will want to keep this checked. This is one of a trio of check-boxes that are normally either all checked, or all un-checked. Those are:
Auto-Connect when started - on the Main Window's Connections group box
Auto-Connect Driver when APCC connects - on the Virtual Ports tab
Create Virtual Ports first, even if not connected - on the Advanced Settings window
Bytes Received: This is the number of bytes received on the virtual port from an application. You can use this field as an indicator that an application is communicating correctly.
Bytes Sent: This is the number of bytes sent out the virtual port to an application connected on the virtual port. You can also use this and Bytes Received to verify that an application has successfully disconnected and is no longer communicating. When an application disconnects, the values will no longer be changing.
SYNC -> RCAL Translation: Use this option to convert SYNC commands to RCALs. Usually you want to set this to Translate to prevent SYNC commands from being issued inappropriately from other applications when the correct function is RCAL. Most programs do not employ the RCAL command and will instead send a SYNC in all circumstances, regardless of whether it is appropriate. Improper use of SYNC, particularly when the mount is in a counterweight-up position, as it might be if you are using the Meridian Delay feature, will cause the mount to become lost since SYNC defines the pier side. This translation feature will help to prevent incorrect commands.
Please read the Sync Explained in Detail and Compared to Recalibrate section for a comparison of these functions.
RA Precision: The maximum number of digits precision to use on the virtual port for hour angle values. Later versions of the GTOCP4 and GTOCP5 firmware can output 2 decimal digits of precision in RA and other hour angle values, however some client applications expect only one digit and may even consider the format corrupted. Setting RA precision to 1 digit can prevent this.
Dec Precision: The maximum number of digits precision to use on the virtual port for degree values. Later versions of the GTOCP4 and GTOCP5 firmware can output 1 decimal digit of precision in Declination and other degree values, however some client applications expect no decimal digits and may even consider the format corrupted. Setting Dec precision to 0 digits can prevent this.
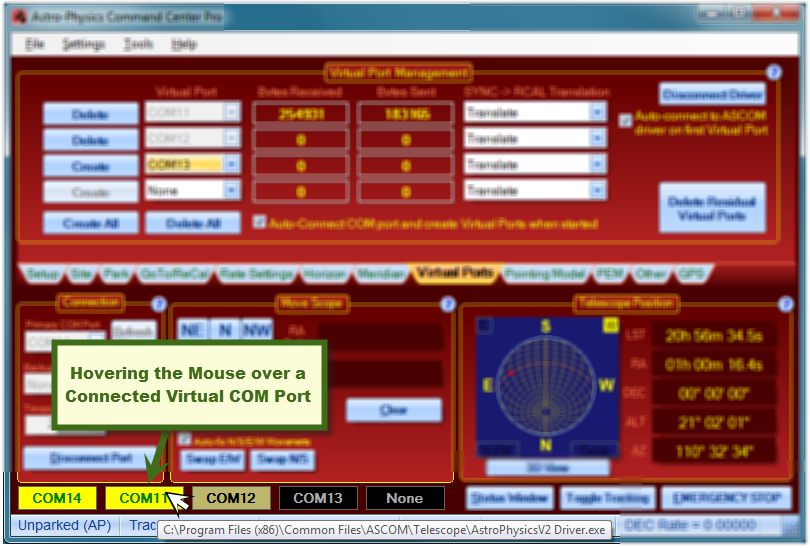
One last thing - Hovering the mouse over a connected virtual port will show the path of the application that is connected on that port.