Setting up your primary Virtual Port

Contents
This section is only for those using the virtual serial ports (VSP) instead of the default REST API. If you use REST API you can skip this section. Also note Virtual Ports tab is hidden when using REST API.
What is a virtual port? Real serial ports are single, unique point to point communication contacts between two, and ONLY two devices. Serial ports, by their nature cannot be shared. Virtual serial ports are software-based rather than physical. Through the Virtual port software, you can effectively create multiple ports that can all be merged into a single entity that can then communicate as a single device to your GTOCP3, CP4 or CP5 servo control box. APCC can create up to four of these virtual ports. The primary port is normally used for the AP V2 ASCOM Driver.
To integrate the AP V2 ASCOM Driver into APCC for seamless operation, you will need to first set up your primary Virtual Port in APCC. This only takes a few moments.
Note: You can allow APCC to simply set up and create the virtual ports for you by checking the box in the Connection Group Box to "Create Virtual Ports First." However, this may create conflicts if you have other unrelated serial devices that might not be connected or active at the moment. We have found that it is often safest to set up the primary virtual port manually to avoid these potential conflicts. Hence, the instructions below: |
1.Decide on Port Numbers. In the latest release, we have limited the available ports to those between 30 and 99. Your first task is to determine which ports are already in use on your computer, and to make a good guess at which additional ports may be added. You may have a port reserved for APCC, and you may have additional ports reserved for such things as a focuser, rotator, dew heater controller, weather station, MGBox, smart UPS or other serial devices. Remember that at setup, you may not have all of these devices connected, and that they therefore may not show up on your system. Use Windows Device Manager to see your current COM Ports. If you use Keyspan USB to Serial converters, the Keyspan Serial Assistant will show you all of the currently connected converters and their assigned port numbers. Otherwise, you can find the assigned ports in Windows' Device Manager.
As a general rule, most people will reserve port #s 1 through 29 for normal "real" ports, whether native or via a USB to serial converter like the FTDI or Keyspan units. COM 30 is often a good place to start with your primary virtual port. If you use a lot of serial devices, reserve ports 1 - 30 for real ports, and start your virtual ports with COM 31. You can go as high as COM 99.
2.Open APCC, if it is not still open from your installation. You do not need to be connected to the mount.
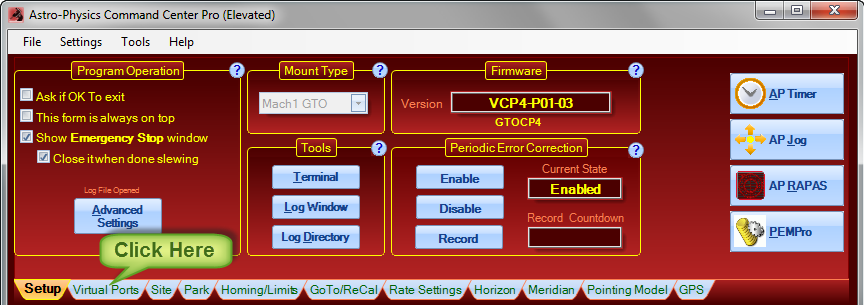
3.Click on the Virtual Ports tab in APCC.
4.Click on the Port Selection Dropdown list for the first (top) virtual port. The default is "None", but all of the available choices will be listed.
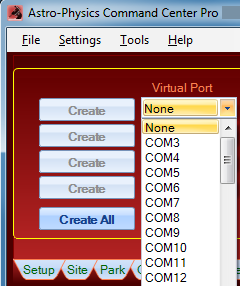
5.Select the COM Port that you decided on in step #1 from the dropdown list
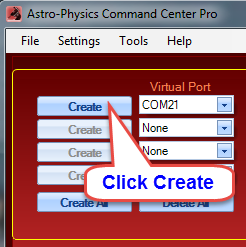
6.YOU MUST click the "Create" button to create the port in your system! This isn't simply an APCC option, but goes to the heart of the PC's operating system.
7.Repeat this for the second COM port (i.e. COM 22) and any additional ports you may need. Defining the second port is recommended so that ASCOM client programs that must be run as administrator can have their own instance of the driver.
8.Remember the primary COM port number you just created, and proceed to the next step in these instructions: Setting up the AP V2 ASCOM Driver
9.More information on using the Virtual Ports can be found under the Main Window => Virtual Ports Tab.